Welcome to XnonymouX Blog

Monday, 19 August 2013

How to crack WEP keys with Windows 7 and Windows 8 without backtrack

By on 08:40


Ok so the programs your going to need is Comview for wifi and Aircrack-ng.
Google comview for wifi and download it.)
AND REMEMBER YOU MUST HAVE A COMPATIBLE WIFI CARD.

Download Aircrack from HERE


Step 1.
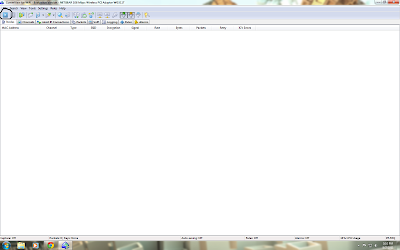
Open comview for wifi. Make sure you see the Blue play button is highlighted like so. Before you click it go to the Logging tab. check mark the box auto saving. then in the first box type 50000 and in the second one type 100.


Step 2. Click the blue play button and a window will pop click start scan.


It will search for nearby wifi signals. Click the one you want to crack and click Capture. Click on the Packets tab and let it do its work. you need around 400,000 packets depending on how secure the network is. you might need more.

Step 3. soon as you have enough packets you want to click the stop button and then click open buffer in new window. This will just open the packets into a new window.


Soon as that opens your going to want to click File iload comview logs. it should open the logs folder were they all saved. MAKE SURE YOU SELECT ALL OF THE LOGS IN THE FOLDER. that means control click each one then click open.


Step 4. Soon as it opens in the buffer window your going to want to click file export wireshark/tcdump. Save it as WEP or what ever you want to call it. Make sure to remember where you saved it . usually the default save location is the log folder. I usually just leave it as is.


Step 5. Close out of the buffer window. Then open up Aircrack-ng GUI. (in the bin folder) When it opens it should look like this. Make sure you have everything in this window set up like mine. Depending on the type of network you will have to change the Bits. But usually everyones is 128.


Next your going to click choose. go to the folder where u saved the WEP.cap file. Select it and click launch. It should open a command prompt saying reading packets. Let it read the packets. When it is done reading packets it will pretty much show a bunch of numbers. At the end of this it should say index number of target network. Type 1 and press enter.


Now here comes the moment of truth. It will either say Failed try again at More IV's. Or it will say Cracked successfully and show the WEP key. If failed go back to comview and repeat the steps. as long as you didnt exit out of comview you can still proceed from the current amount of packets you have.


Proof that it works


Wednesday, 22 May 2013

How to Know ADMIN PASSWORD THROUGH GUEST ACCOUNT

By on 11:37

How to Know ADMIN PASSWORD THROUGH GUEST ACCOUNT


Hello guys, Today will provide you 2 awesome and easy trick through which you can hack admin account through guest account.\


If you been using someones Pc in guest account and want to have Admin privilage then worry not,there is a trick for you to Gain Admin Privilage .
lets get started with it.


steps

1) Go to C:/windows/system32.

2) Copy cmd.exe and paste it on desktop.

3) Rename cmd.exe to sethc.exe.

4) Copy the new sethc.exe to system 32,when windows asks for overwriting the file,then click yes.

5) Now Log out from your guest account and at the user select window,press shift key 5 times.

6) Instead of Sticky Key confirmation dialog,command prompt with full administrator privileges will open.

7) Now type “ NET USER ADMINISTRATOR "zzz" where “zzz" can be any password you like and press enter.

8) You will see “ The Command completed successfully" and then exit the command prompt and login into administrator with your new password.


9) Bravo !! Now You have hacked admin through guest account.

Monday, 20 May 2013

How to Break a BIOS Password (for laptop and pc)

By on 20:35
How to Break a BIOS Password (for laptop and pc)
-----------------------------------------------------------------
Methods of breaking password for Desktop PC and for laptop is quite different. We would explaineach. 
Break BIOS Passwordfor Desktop : 
If it's a desktop PC, erasing the cmos memory will usually clear it.
Steps: 


1. Power off the computer and make sure that it is unplugged. 
2. Open up your computer case. You need physical access to themotherboard to complete this procedure.
3. Find a circular, (mostly) silver metallic object on the motherboard. This is the CMOS battery.
4. CAREFULLY remove the CMOS battery and leave it out for about 120- 180 seconds. This will flush the CMOS memory which stores the BIOS password and all other configuration. (See Warnings)
5. Set the battery back into place and power on the computer.
6. The computer should then warn you that the CMOS configuration could not be found. You can either reconfigure it yourself or restore defaults. Restoring the default configuration should befine.
7. You will notice that the BIOS password has been cleared and you can boot without it. You may reset the BIOS password to something else bygoing into the BIOS configuration and setting a new User Password.
Alternate Methos: (More Dificult)
Remove a jumper: There's a jumper on your motherboard that you'll need to identify and remove. Most motherboards make your job easier by actually labeling the correct jumper as"BIOS config" or something similar. (it looks like a small plastic thingy on 2 pins with 1 pin beside it, within a 1" of the battery). If you're having trouble looking for it, look in the motherboard manual.After you have found it, carefuly pull straight up on it, and place it on the 2-3 pins(it was on the 1-2 pins). With the battery removed and the jumper moved, turn the computer on, and check to see if you can get into the bios. If you are able to, turn the computer off, put the jumper back on pins 1-2, and put the battery back in. Lastly put the case together and you are done.
Note: Don't forget to configure the BIOS (if you know how) after this process. If you you don't know how, just hold the "delete" button when starting your PC and when the blue screen appears, find the load safe defaults settings and press:
*. ENTER button
*. Y button
*. F10 button
Break BIOS Passwordfor Laptop :
Remember that laptops can be trickier, especially if it's a newer model. If it has a security chip on the motherboard forget about it. You either have to physically remove the chip or contact the mfg for the "master" password. If you can boot up off of a cd or floppy try any of these methods:
1. Create a Win98SE bootable media "or anything that lets you boot into MS-DOS" and boot off of it.
2. When the A:\> prompt appears type debug and press enter.
3. You will then only see a "-".
4. Type o 70 2E "include the spaces" and press Enter.
5. Type o 71 ff "include the spaces" and press Enter.
6. Type q and press Enter.
7. Here are a list of common mfg backdoor passwords
*. AWARD BIOS
AWARD SW, AWARD_SW, Award SW, AWARD PW, _award, awkward, J64, j256, j262, j332, j322, 01322222, 589589, 589721, 595595, 598598, HLT, SER, SKY_FOX, aLLy, aLLY, Condo, CONCAT, TTPTHA, aPAf, HLT, KDD, ZBAAACA, ZAAADA, ZJAAADC,
*. AMI BIOS
AMI, A.M.I., AMI SW, AMI_SW, BIOS, PASSWORD, HEWITT RAND, Oder 

Doxing

By on 20:28
First, let me explain what Doxing is. Doxing is the process of gaining information about someone or something by using sources on the Internet and using basic deduction skills. Its name is derived from “Documents” and in short it is the retrieval of “Documents” on a person or company.


You’re probably thinking, “Okay, so basically it’s getting information from searching someone’s email on Google right?” in a sense yes, but there are actually easier ways to get someone’s information online. The most popular and most common method is to use a website called Pipl (http://www.pipl.com/). Pipl allows you to search for full names, emails, usernames, and even phone numbers, thus making it a very useful tool for hackers. Another source hackers can use is Facebook (http://www.facebook.com/). Sure, Facebook allows full name searches, but most hackers aren’t using it for its name search; they’re using it for its email search. The main goal when Doxing is to find the target’s email (if you don’t have it). Your email is essentially your passport online; you sign up for websites using it, you have personal information on it, and if someone has access to it, they can essentially pretend to be you online. Once the hacker has the email, all he has to do is put it into Facebook or Pipl and he will be able to find you, assuming the email he has is connected to some account you have online. On the flipside of this, in order to find your email, the hacker either has to guess your email, befriend you on Facebook,or, hack one of your vulnerable friends and view your email that way. Once he’s done that, you’re in trouble. Now, you’re probably thinking, “How’s he going to hack me with just my email?” well, that’s where Doxing comes in handy. If he can view your Facebook account, or he can find some other bit of information about you using Pipl, he can do what’s called reverting. Reverting is the process of using the target’s email’s recovery questions to gain access to the target’s email. Now, you may be thinking, “How’s he gonna guess my recovery question answers?” well, take a second look at your recovery questions and ask yourself, “Can someone find this answer online?” If you answered yes, then you’re vulnerable to reverting. Any hacker reading this, that didn't previously know about reverting, would probably look at this and say “This would never work!” but you have to remember… we’re all humans, and we all make mistakes. Surprisingly, this method works more often than you’d think, but it is not for anyone who is lazy. Doxers tend to spend a while searching around the web for information that they can use. Chances are, you’ve made some mistakes online, and if a skilled Doxer finds that mistake, then you’re in trouble. The Doxing method is based purely on the ability of the hacker to recognize valuable information about his target and use this information to his benefit. It is also based around the idea that, “The more you know about your target, the easier it will be to find his or her flaws.” How can you insure that you won’t be Doxed? Well, as the Internet becomes more and more useful and addicting, it will become harder to not get Doxed. The main issue for most victims is their security questions, and their password security. If a victim has a very easy-to-find recovery question, then the victim will be easily reverted within a matter of seconds. Also, if the victim has a simple password, it could get brute forced simply by using a wordlist that applies to the victim’s interests, likes, and fancies (of course, this method is not as popular). So, the main rule to not getting hacked is: Have secure passwords, and almost impossible to guess recovery questions. The main rule to not getting Doxed is… to just stay off the Internet; but, who wants to do that?

Saturday, 18 May 2013

How to Unfriend Multiple People at Once on Facebook

By on 22:02

Facebook-logoAre you missing out your friends’ important updates on Facebook timeline? Because you have more number of unknown people added as friends and their updates are getting added up on your timeline. Then it is time to delete or unfriend those unknown people from your Facebook account. It will take a lot of time to unfriend each profile one by one if you have too many friends. So you need a tool that can unfriend more number of people with just a few clicks.
This is where userscript Delete Facebook Friends comes handy. With this userscript you can bulk delete all your friends on Facebook. This is a Greasemonkey userscript that works with both Firefox and Chrome (to install this userscript on Chrome you need Tampermonkey extension).

How to Bulk Unfriend People on Facebook:

For Firefox users:

1. Download and install Greasemonkey addon.
2. Then install Delete Facebook Friends userscript.
3. Go to Facebook, open your Friend list page by clicking on FRIENDS in the Facebook sidebar
Click-on-Friends-in-the-sidebar
then click on See all friends button at the top of the page.
Click-on-See-all-friends-button
4. Now on your Friends list page you will see two extra buttons added at the top, Select all and Delete Selected Friends.
Two-extra-buttons-at-the-top
5. Here on this page check the profiles which you want to delete. Once you finished selecting your friends, click on Delete Selected Friends button at the top.
6. That’s it. All your selected friends are now deleted.

For Chrome users:

All the steps are same for Chrome users, except that you will need Tampermonkey extension to install theDelete Selected Friends userscipt.